Hey there, hardware enthusiasts! Have you ever dreamed of strolling through your digital wonderlands, and suddenly - BAM - you're slapped with the out-of-VRAM blues? Fear not! Today, I'm going to walk you through the mad science project of beefing up a blower-style 2080 Ti from a "mere" 11GB to a monstrous 22GB. Plus, we'll give it a triple-fan cooler facelift that'll have it purring like a kitten riding a cloud. Disclaimer: If your soldering skills are more "hot potato" than "hot rod," grab some popcorn instead, and enjoy the read!
The Need for Speed (And Space)
Why embark on this digital odyssey? Because when it comes to AI training or slicing through 4K textures like warm butter, your VRAM can feel tighter than spandex on a sumo wrestler. More VRAM means more space for data munching, and who doesn't want their GPU to double as a mini data center?
The Operation Begins
Grab your screwdrivers, it's teardown time! Carefully dismantle your 2080 Ti, paying homage to each screw and thermal pad (pour one out for the stock cooler). Take note, brave soldier, this process isn't for the faint-hearted. You'll need a steady hand worthy of a bomb defusal expert, or, you know, someone who can actually hold a soldering iron without dancing the hot-foot boogie.
Playing with Fire (Sort of)
Next up, you'll heat up and remove the VRAM chips with the grace of a ballet dancer juggling flaming swords. Sprinkle some magic soldering oil to bless those solder pads with future prosperity. If you're new to this carnival ride, consider practicing your hot magic tricks on a budget GPU before risking your pride and joy.
Replacing the Guts
Once you've soothed those solder pads with suction tape (and whispered sweet nothings to them), it's time to introduce them to their new silicon comrades. We're talking high-density, 2GB VRAM chips, the kind that'll make your GPU flex in the mirror. Just imagine it: 11 chips standing tall, promising a future of unparalleled data buffet.
Wield the Hot Air Like Thor's Hammer
Carefully, and I mean with-your-grandma's-china-levels of care, reflow your shiny new VRAM chips. Proper application of heat here is crucial - too little, and you'll get a cold joint, too much, and you're hosting a VRAM barbecue. Adjust your technique according to your tribute to the solder gods.
The Moment of Truth
It's alive! Hopefully. If you've managed to escape the pitfalls of poor soldering, resisted the urge to hammer chips in place, and didn't end up using your GPU as an impromptu frisbee, you should have a functioning Frankenstein's monster… I mean, a 22GB 2080 Ti.
Cooling Down the Beast
We've drastically transformed the card’s inner beast, so it's only fair we give it the crowning jewel - a triple-fan cooler. You might need to channel your inner MacGyver as you reposition power connectors and fiddle with shrouds. The result? A card cooler than the other side of the pillow.
Testing, One Two Three
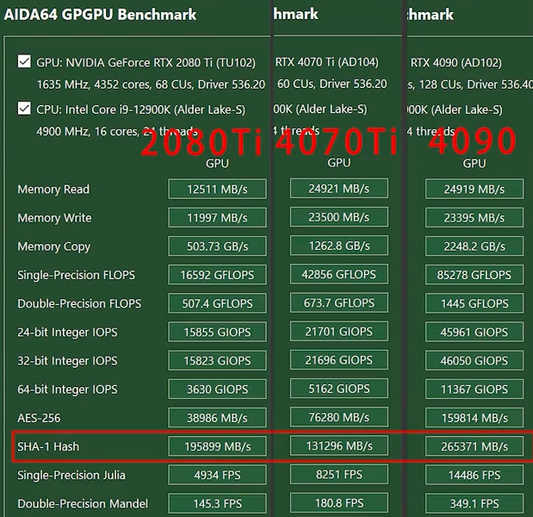
With the wrath of the gods averted, it's benching time. Fire up 3D Mark to take your beastly card through its paces. If all goes well, it should chew through tests like a termite with a wood addiction.
Epilogue
Congratulations, you've successfully played GPU Frankenstein, and now you've got a 2080 Ti breathing fire and brimstone with 22GB of VRAM. Bask in the glory of your handiwork!
Does your card now rival the mightiest GPUs on the market? Will it conquer rendering tasks that would make lesser cards weep? Well, that's for you to discover. One thing's for sure, your DIY project might just make you the envy of the PC modding underworld.
Remember, with great power comes a great electricity bill. Game on, modders! 🎮🔧