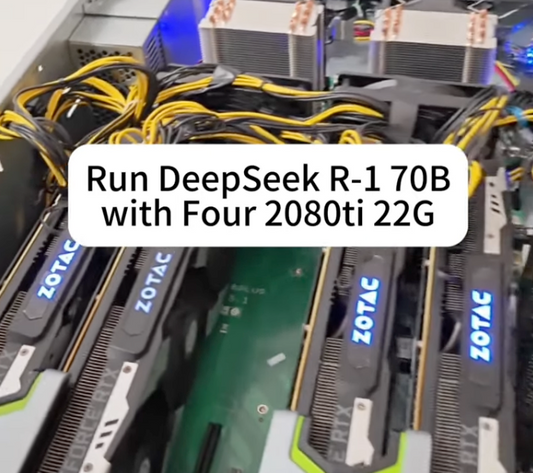
Are you a tech enthusiast looking to push the boundaries of your RTX 2080 Ti graphics card? Perhaps you've heard whispers on the internet about transforming its default 11GB memory to an impressive 22GB – rivaling even the formidable laptop RTX 4080. Well, get ready to roll up your sleeves because this blog post will guide you through this ambitious but achievable DIY upgrade!
- Disassemble the GPU. You will find the 11Gb memory consists of eleven 1Gb memory particles.
- Remove them.
- Replace them all with 2Gb memory particles
- Change the resistors and you're done!
That's how easy it is to make a 2080ti 12Gb graphics card. The upgrade is on par with a laptop 4080. Do it yourself. Double the fun!
Before we delve into the step-by-step process, here's a quick disclaimer: This upgrade is not for the faint of heart. It involves intricate hardware manipulation that requires a steady hand and a deep understanding of electronics. Mistakes may damage your GPU or void warranties, so proceed only if you're confident in your skills and understanding of the risks.
Without further ado, let's dive into the nitty-gritty of turning your RTX 2080 Ti into a memory powerhouse.
Step 1: Disassemble the GPU
First things first, you'll need to carefully take apart your GPU, revealing the inner workings where the memory modules reside. You'll likely void your warranty here, so make sure you're committed before you unscrew that first screw.
1. Power down your PC, unplug all cables, and remove the GPU from your system.
2. Use the appropriate screwdrivers to remove the screws from the GPU casing. Handle it gently to avoid static damage.
3. Carefully remove the GPU's cooler, pay attention to the thermal pads and paste; you'll need to replace them during reassembly.
4. Locate the eleven 1Gb memory modules on the PCB. These are your targets for replacement.
Step 2: Remove the Existing Memory Modules
Now comes the precision work. Removing and replacing components on a PCB can be tricky, and it's usually done with a rework station by professionals.
1. Use a high-quality soldering iron or a hot air rework station to de-solder the memory chips. Maintaining the appropriate temperature is crucial to avoid damage to the board or chips.
2. Gently lift each chip after de-soldering. Patience is key here; rushing could result in lifted pads or traces, which could be disastrous.
Step 3: Replace the Memory Modules with 2Gb Particles
With the old memory removed, it’s time to install the new 2Gb modules.
1. Source compatible 2Gb memory particles. Make sure they match the specifications required by the RTX 2080 Ti's architecture.
2. Position each 2Gb module in place where the 1Gb modules were removed.
3. Carefully solder the new memory modules to the PCB. Ensure each pin is properly connected, without causing shorts.
Step 4: Change the Resistors
Altering the memory size also means tweaking the resistors on the PCB.
1. Identify the resistors related to memory configuration – the service manual or schematics of your GPU will be handy here.
2. Remove the existing resistors and replace them with the correct values to match the new memory configuration. Mistakes here could prevent the GPU from functioning properly.
Finalizing the Upgrade
1. Apply fresh thermal paste to the GPU die and replace the thermal pads if necessary.
2. Re-attach the cooler and reassemble the GPU casing.
3. Insert your GPU back into your PC, connect all necessary power cables, and turn on your computer.
The Moment of Truth
If everything was done correctly, your system should recognize the RTX 2080 Ti with a full 22GB of memory, giving you performance that stands shoulder-to-shoulder with the mobile RTX 4080.
However, keep in mind that such modifications are theoretical and not officially endorsed. While this process may seem plausible, it is incredibly complex and may not be practical or achievable for various reasons, such as BIOS incompatibilities, hardware limitations, and the risk of irreparable damage to the GPU.
In the real world, unless you have advanced skills in electronics and access to professional equipment, such an upgrade is not recommended. For most users, if you're looking for improved performance or greater memory capacity, the best course of action would be to purchase a new GPU that naturally comes with the desired specifications.
Remember, this guide is a purely hypothetical exercise and should not be taken as practical advice. The attempt to physically modify high-end hardware like the RTX 2080 Ti GPU can easily result in its complete and utter failure. If you're still itching for an upgrade, consult with professional services or consider investing in a newer model that meets your needs. Stay safe, and happy computing!